Category: Photography Page 7 of 24

Tips and guides for readers who want to take better photos to display on their Nixplay Frames.

appo photo organization course

Looking For A Better Way To Organize Your Photos?

Are you overwhelmed with your growing photo collection? Are your digital images and videos scattered over various devices and in different locations? Google Photos, Amazon Photos, One Drive, Flickr, DropBox, Smug Mug, iCloud Photos, DVD’s, CD’s, old computers, memory cards, and flash drives; it’s no wonder people struggle with finding and viewing their favorite photos.

Technology has made the process of connecting with our family photos very difficult. Somedays it can feel like you need a master’s degree in technology.

But don’t worry—help has arrived! The Association of Personal Photo Organizers has spent months compiling years of knowledge into two easy-to-follow courses designed to take you step-by-step through the organizing process.

appo blog photo organization courses

Digital Photo Organizing Made Easy is an in-depth course with easy to follow video tutorials, handouts, resource guides, and a private Facebook group. You will learn how to find, organize and consolidate your images & videos into one manageable library so you can easily access, share and backup your most important memories.

Need help with those boxes of printed photos and home movies? Then you’ll love our second course, Printed Photo Organizing Made Easy. This course also has a private Facebook group and over 2.5 hours of instruction that takes you step-by-step through the process of organizing (and digitizing) your printed photos, memorabilia, old media, and home movies.

If organizing your photos is on your to-do list, then now is the time to invest in learning and completing your photo organizing project!

Cathi Nelson, author of Photo Organizing Made Easy; Going from Overwhelmed to Overjoyed, is the leader of a global photo organizing movement. A cutting-edge entrepreneur and speaker, in 2009 she founded The Photo Managers, the leading organization serving entrepreneurs through training, a professional certification program, best practices, and a code of ethics that sets high standards for the rapidly growing photo management industry. She’s built a worldwide community and organization around supporting people in creating thriving businesses doing work they love. She’s been featured in the New York Times, The Atlantic, Real Simple Magazine, and The Wall Street Journal about how to organize and preserve the legacy of your family heritage through photos.

nixplay blog-photography challenges-main

5 Photography Challenges You Can Try In 2019

If you’ve always wanted to improve your photography skills, 2019 is the best time to work on it. You’ve got a whole year ahead of you to seize every opportunity to take better photos, so don’t waste any time! Start by taking on these challenges.

1. The 52-Week Photo Challenge

The annual Dogwood 52-Week Photography Challenge dares photographers to stick to a specific prompt every week. You’ll start by taking a self-portrait—a deceptively easy task, until you keep reading the prompt and realize that the prompt prohibits you from showing your face. When you’ve accomplished that task, you move on to showing motion in photos using the Rule of Thirds, then Black and White photography, and so on. The challenge ends with another self-portrait, one that illustrates how others see you. You can also join a Facebook group where you can talk with others who are also taking on the challenge. See all the prompts here.

2. The 365-Photo Challenge

Think the 52-Week Challenge is too easy? Try the 365-Day Challenge. Taking one photo a day looks easy on paper, but when you’ve got a million things going on in your awesome life, you might find it nearly impossible to stop and shoot. No photography prompts required—you don’t have to go out of your way to find a great subject to take pictures of. The real challenge here lies in making the mundane beautiful.
Tip: Create a folder on Google Photos for your images and sync it with your Nixplay Frame so you can view all your photos easily!

3. Go Analog

Film photography isn’t dead. It’s just lying dormant, yet ready to embrace those who discover it. One key takeaway from shooting with film is that you’re forced to be more selective with your subjects. You don’t have the privilege of taking photos of everything because you can only shoot a limited number of images, and you don’t know how the shot will turn out until much later. On the bright side, the thrill of waiting for your film to develop is incomparable, and there’s nothing like a hard copy of your photos. This year, dust off your film camera (or get a disposable one), load it up with film, and shoot away!

4. Portraits of Strangers

Humans Of New York is one of the most inspiring Instagram accounts anyone can follow. Founder Brandon Stanton’s photographs, combined with the moving stories of the people he features, make for a riveting read. This year, take a page from HONY and try taking photos of the people you encounter! It’s also a great opportunity to get out of your shell and meet interesting folks. Who knows, you might just meet someone cool!

5. Recreate Famous Photos

There are some photographs that anyone can recognize instantly. Take the 1965 photograph of Muhammad Ali towering over a fallen Sonny Liston, taken by renowned sports photographer Neil Leifer. Or, the nude portrait of a pregnant Demi Moore, taken in 1991 by Annie Leibovitz for Vanity Fair. Let these photos inspire you to make your own mark in the photography world, one frame at a time!

globosurfer guest blog

The Ultimate Guide To Nature And Outdoor Photography

If you love nature and wildlife photography, chances are good you have come across a picture that completely blew your mind at some point in your life. Maybe it was a close-up of an amazing plant you had not laid your eyes on before or an awesome shot of the sunset framed by mountainous terrain. Perhaps it was a stunning ocean view picture that got you wondering, “How the heck did they capture that?”

Well, the truth is, most of these impossible-to-believe shots are not easy to come about. Outdoor photography can be challenging because the subjects can be unpredictable. You’ve got to be prepared, practice a good deal of patience, and have some self-made luck. Nevertheless, we have prepared a quick guide for you to get a headstart. Ready?

1. Know Where You’re Headed

Is photography allowed in the area? Do you have to pay a certain fee to take photos? Are there dangerous animals that are likely to interfere with the process?

Even before heading out, do your homework. Get as much information as possible about the area you intend to get on film. Private lands may restrict photography or require you to pay a fee to shoot, so you may want to avoid these. Similarly, if you will be visiting an area with lots of wild animals, you need to bring your best zoom lens and be properly armed just in case.

Never head out clueless. You can never be completely prepared for all the challenges you might face outdoors, but knowing what to expect will help you stay safe and enjoy your expedition to the max.

2. Gear Up

…and do it right!

You don’t need the most expensive camera for hiking and backpacking, nor do you need the greatest telephoto lens to have breathtaking wildlife and landscape photography. Sure, these can be nice to own. But since you will be surrounded by charming and beautiful views, all that’s required are perseverance, patience, and image-capturing skills.

However, you still need to know what your kit can and cannot do to avoid disappointment. And aside from knowing where you are going, you’ll also need to know what you’ll be shooting. While there is no all-purpose lens that can cover every situation or secret formula to take the best shots, being well-informed will help you create stunning images.

If you think your day will end with a dive into the nearby lake, pack a waterproof camera so you can capture all the awesomeness of the underwater world. It’s also a great investment if you love fishing and would like to get some of those bass and catfish moments on film. That way, even if something goes wrong and the camera slips overboard, it won’t get damaged by water. You can also buy camera housing to better shield your expensive gadget from water damage.

As for what you should pack, extra lenses, memory cards, batteries, and a tripod are a no-brainer. For wild animal and bird photography, bring your best zoom lens. This will help you maintain a safe distance between you and the subject, especially if it gets scared easily. A macro lens, meanwhile, is perfect for capturing small creatures (like insects) and details. and make sure you have learned how each item works before heading out.

How about navigation? Here’s our tip: Don’t just rely on your GPS. Have a map and compass handy. You may also want to bring a flashlight just in case the night catches up with you in the woods.

Finally, don’t forget your selfie stick so you can take a picture of yourself hanging off a cliff or kissing a cuddly animal!

3. Pack Your Kit Properly

You may own the most high-end tools available for outdoor photography, but if you don’t know how to pack them properly, then your investment might just go to waste. If you are serious about taking your photo shoot to the wilderness, then you must invest in a bag that can carry your essential tools securely.

Look for a camera bag that straps snugly on your body. There are plenty of these in the market, with options available for every budget. Of course, the deeper your pockets are, the higher the quality of the camera bag that you can buy.

It would be wise to consider a bag that’s waterproof. The weather can be quite unpredictable out in the woods, and having a bag that doesn’t let water in will keep your photography gear dry and safe from the harsh atmospheric conditions.

Unfortunately, most of the water-resistant camera bags available today come with a high price tag. However, this should not discourage you from heading out when it rains. Any kind of weather can yield unique and fantastic photos. You can just grab a rain cover and wrap it around your kit carrier. And if you can’t get a hold of this either, even a trash bag can do the trick!
globosurf guest blog post

4. Dress For The Occasion

For your outdoor photography shoot to be successful, you must be comfortable in what you are wearing. And to dress right, you need to listen to what the weatherman says.

If you are hiking in cold weather, for instance, put on something warm. Good layering, topped with a fleece jacket, would be a great place to get started. Don’t forget a pair of gloves too! The last thing you want is your fingers being completely frozen that you can’t even press the shutter button.

Mind your feet as well. A sturdy pair of hiking boots will keep them warm, comfy, and protected from snow, water, rocks, mud, and creepy crawlies. If your feet get cold or uncomfortable, you will start thinking about aborting your expedition—exactly what you do not want.

Finally, it’s always a good idea to have a raincoat or a waterproof poncho in your bag. You never know when it’s going to rain!

5. Shoot Raw

Once you are on site, shoot in “raw” format so you can obtain the best quality and more powerful images. You can set your camera to this format to capture unprocessed photos straight from the image sensor.

While raw images usually take up more space on the memory card than JPEG files, they do contain a larger amount of pixels that allow for more room for adjustments during image processing.

6. Take Advantage Of Natural Light

Natural light is outdoor photography’s best friend. Your photos will look amazing in the morning when the sun rises, as well as in the late afternoon when the sun starts to set. the light during these “golden hours” has a mellow, foggy quality that illuminates your subjects beautifully and removes the harsh midday shadows. The golden hues from the rising or setting sun provide an emotional overlay to the images, giving them a spectacular look.

Don’t believe us? See for yourself and try shooting during sunrise or sunset, and at noon. You will clearly notice the difference in color temperatures and tones in photos taken during these times. Mornings are more preferred to evenings as photography areas are less crowded, and you won’t worry about running out of light. If you are shooting wild animals, this is also the time when most species are more active.

7. Show ‘Em Off!

You shouldn’t keep all those precious memories with Mother Nature to yourself! Share your pictures with your friends and relatives, post a few shots on social media, and get a frame to display your favorites.

Speaking of frames, a digital one will be perfect. A NIX frame will do things that traditional frames can’t, like displaying photos in a slideshow, shuffling, and playing HD videos. If you are looking for a way to smartly display and organize your photos, this is it. Just plug your camera’s SD card, sit back, and enjoy the show.

Sure, a digital frame could be a little pricey, but it is the most high-tech way to showcase your prowess in nature photography. Grandma will also thank you because she won’t have to keep going back and forth to your web page for photos!

Summing It Up

Outdoor photography can be challenging, but if done right, you can reap huge artistic benefits as well as spiritual and personal rewards.

Nature never gets old. There are endless opportunities to capture fantastic photos of the wilderness. Just make sure to do your research before you go, prepare the gear your need for the day, and know the perfect time to shoot.

Finally, don’t cancel your trip just because you think the weather would not be good. Good atmospheric conditions don’t always guarantee good shots, and you can get splendid images even in harsh weather. Just dress appropriately, protect your gear, and get going!

best colors-main

The Best Colors To Wear In Photos

Choosing what colors to wear in photos can be difficult, especially if your wardrobe is limited or you’re not used to having your picture taken. Nonetheless, by following these tips, you can choose colors which work for you and achieve the effect you’re going for. So, what are universally agreed to be the best colors to wear in photos?

Black or dark hues

Black and dark colors are known for being slimming. This is because they mask any shadows, lumps, or bumps which may be under an outfit. Black is also a dramatic choice which often carries an authoritative quality to it. If you want to make yourself look slim, powerful, and strong, blacks and dark colors are often a good choice, especially when contrasted with a lighter background. Just make sure that you don’t overdo it: You don’t want to look like you’re going to a funeral or dressing for Halloween!

Vibrant colors

Vibrant hues, such as brights reds, yellows, and blues, can make for a really visually striking photograph. Donning a vivid hue can make you look more bold and interesting in your photos, but they aren’t right for everyone. Typically, people with darker skin tones can pull off vibrant colors better than people with paler complexions, who can look washed out and lifeless when wearing bright colors that don’t suit them.

Earthy tones

Earthy tones are among the best colors to wear in photos. This is because they tend to suit a wide range of skin tones and complexions, looking just as good on pale people as they do on darker-skinned folks. Earthy tones are great if you’re going for a more casual vibe in your photo—they are not striking, yet they are pleasing to the eye due to their natural qualities. Speaking of earthy tones and natural colors, why not check out our blog on how to make fall photos pop?

Block colors

It’s often a good idea to avoid patterns for photographs, as they can make the photo appear busy and distracting. If you must wear patterns, try sticking to classic designs like stripes or small polka dots, as anything more intricate is going to draw the viewer’s eye to too many places. If more than one person will be in the photo, try to avoid wearing clothing with multiple patterns. Block colors are best for maximizing the simplicity and aesthetic of a photo.

Marianne is Nixplay’s Web Content Editor. Her hobbies include exploring new places, playing table tennis, and cuddling puppies. Send her a message at marianne.salazar@nixplay.com.

halloween scary photos main image

5 Haunting Photos And The Stories Behind Them

Warning: Some photos might be disturbing. Please proceed with caution.

It’s not always the prettiest photographs that get remembered. Sometimes, it’s the haunting photos that remain firmly embedded in one’s mind. Here are some eerie images you won’t easily be able to get out of your mind.

PS: Sweet dreams!

The Genesee Hotel suicide

genesee hotel suicide scary halloween photos

On May 7, 1942, Mary Miller checked in the Genesee Hotel, went to the women’s communal restroom on the eighth floor, and stepped out on the ledge through the window. She waved to the crowd then pushed herself into the busy street, much to the horror of the onlookers. I. Russel Sorgi, a photographer for the Buffalo Courier Express, “waited until the woman passed the second or third story” before masterfully clicking the shutter.

Hiroshima’s “nuclear shadows”

steps-hiroshima-shadows scary halloween photos

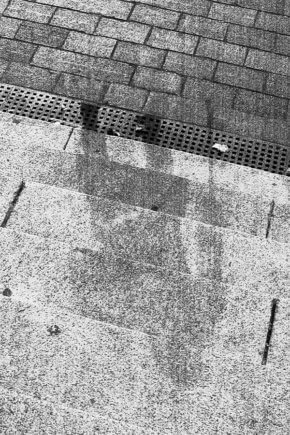
On August 6, 1945, an atomic bomb was dropped on the Japanese city of Hiroshima, flattening majority of the city and instantly killing over 70,000 people. The intense heat of the explosion vaporized thousands of living beings before they even knew what was happening, leaving haunting outlines behind them.

This security camera footage

redbox haunting halloween photos

Is it a modern-day version of The Exorcist? Nope, just a non-possessed woman whipping her hair back and forth. Blame it on the security camera’s wide-angle lens, which managed to capture her face and the top of her head as she shook her tresses out.

Also read: 5 Spooktacular Places For A Picture-Perfect Halloween

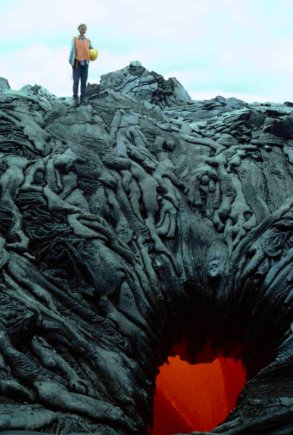
The West Kamokuna Lava Skylight

lava bodies scary halloween photos

No, that’s not the entrance to hell—though it sure seems like it! This is a photo of Hawaii’s West Kamokuna Lava Skylight, taken on April 1, 1996. The “bodies” are actually different lava flows that have dripped into a hole leading to an underground lava tube. Despite the scientific explanation, it’s still one image we’d rather not see late at night.

Tereska drawing her home

tereska halloween scary photos

This photo, taken in Warsaw, Poland by photographer David Seymour in 1948, depicts a young Polish girl in a special school for war-handicapped children. The girl, named Tereska, was asked to draw her home. Her distressing scrawl can be attributed to the suffering she and her family endured during World War II.

Got a haunting photo of your own? Why not display it on a Nixplay Frame this Halloween to add some extra spook to your holiday? Until November 4, you can save up to 20% off select Nixplay Frames, until supplies last. Stocks are selling quick, so hurry!


Marianne is Nixplay’s Web Content Editor. Her hobbies include exploring new places, playing table tennis, and cuddling puppies. Send her a message at marianne.salazar@nixplay.com.

Page 7 of 24

Powered by WordPress & Theme by Anders Norén